SimpleraTM sensor support
for use with MiniMed GoTM system
Select the topic that fits your support needs:
Before you insert your sensor, gather all of your supplies:
- Simplera sensor is an all-in-one application.
- Alcohol wipes to clean the insertion site.

Know your sensor life
The sensor lasts up to 6 days, with a 24-hour grace period.
When the sensor enters the grace period, the calendar icon![]() will appear in the top right corner of the app Home screen. When the sensor is expired the red calendar
will appear in the top right corner of the app Home screen. When the sensor is expired the red calendar ![]() will appear.
will appear.
Keep in mind, you can always see how many days of sensor life remain by tapping Devices from the Home screen.

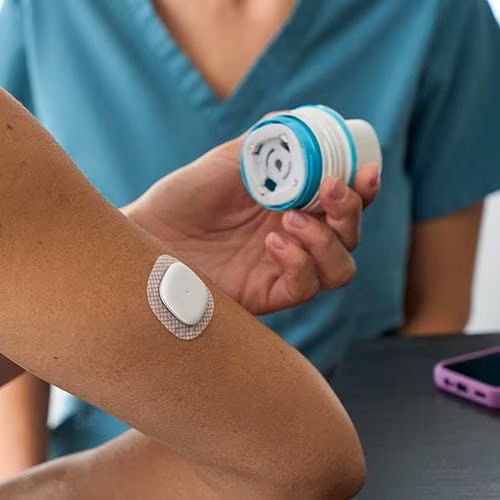
The SimpleraTM sensor is only approved to be worn in the back of the upper arm, for those 18 years of age and older.
Do not use the Simplera sensor on the abdomen or other body sites including the buttocks, due to unknown or different performance that could result in hypoglycemia or hyperglycemia.
The sensor should be at least 1 inch away from any manual insulin injection site (syringe, pen).

Dos and Don'ts for sensor insertion
Do
- Push on top of the inserter (either with the palm of the hand or fingers) to activate the inserter
- Insert with a smooth, firm, continuous motion
Don't
- Wrap fingers around the inserter (with no force applied to the top)
- Go slowly, halfway, pause/stop right before activation

3. Prep the skin using an alcohol wipe and let your arm completely dry before inserting.

4. Press the inserter firmly yet swiftly against the insertion site until you hear a click.

5. Use your finger to smooth down the adhesive.

All Set!

To start the sensor:
- Open the MiniMed Go app.
- Tap Devices.

3. Tap Simplera.
If Simplera is not listed, tap Pair new device, tap Simplera, then tap Continue.


4. Tap Start now.

5. Read the following screens and tap Continue.
6. You can watch the in app video or follow the steps below to insert your sensor. Once your sensor is inserted tap Sensor is inserted.
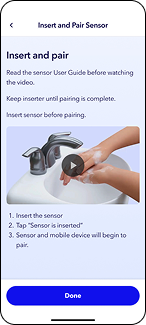
7. You app will search for the sensor. Once it is found confirm the serial number on the screen matches the one from your newly inserted sensor. If they match, tap Confirm and pair.

8. Look for the 6-digit code on the inserter. Enter the code on the Enter code screen, then tap Pair.

9. Your sensor will pair, you should see a Your sensor is now paired! message. Tap Done.
It will take up to 2 hours for your sensor to warm up before you start to see sensor glucose (SG) values on the home screen. For the first 12 hours after inserting a new sensor, use a blood glucose meter reading to make all treatment decisions.
The sensor will continue to work for 6 days, plus a 24-hour grace period. Afterwards, you will need to insert a new sensor. To remove, gently peel the sensor adhesive away from your body.
Bleeding may occur at the insertion site and is not unusual. Here are 3 tips to help you manage bleeding:
1. If bleeding persists, apply steady pressure with a sterile gauze pad or clean cloth on top of the sensor for up to 3 minutes.
2. If bleeding continues after 3 minutes and is significantly visible, or there is excessive pain or discomfort, then remove the sensor and continue to apply steady pressure until bleeding stops. Discard sensor and insert a new SimpleraTM CGM in a different spot!
3. Check the site for redness, bleeding, irritation, pain, tenderness, or inflammation. If you notice any of these, contact a healthcare professional.